Noelle Darts / PCOMP
Week 0: Rube Goldberg
My group got inspired by the cold weather so decided to make a scarf-wrapping device. We started out by brainstorming ways the energy needed to wrap the scarf around could be generated (weight, wind, heat) but we ended up deciding on animals because they could provide a burst of movement and are driven by food/toys. We brainstormed a dog chasing biscuits or a squirrel looking for acorns but got inspired by Nory’s cat instead. Because cats are driven by laser beams we decided to attach the cat to the scarf and then make a hat that points a laser beam for the cat to follow in the direction of the scarf.
Because the group before us left us with a ball, we decided the ball could push a button which would turn the laser on. The group after us also needed a ball so we made the wind energy created by the scarf push the ball forwards.
In the future maybe we should think of a way to stop the cat from strangling the human :)
I’mmMG
Week 1: Switch Assignment
I’m currently working on a series where I replicate all of the objects I use in my nightly routine in ceramics. Lately I’ve been feeling kind of exhausted with the routine so actually remaking all of the steps (lip balm, retainers, face wash, face cream, retainers, contact lenses (I wear them to sleep--OrthoK), sleep mask, hair rollers) makes me feel better in some weird way. The whole series is kind of about rituals but also how exhausting it can be to be a person (and a woman).
I wanted to see if I could get some sort of visual feedback from the routine. I set up a switch that requires three steps to be completed before the LED lights up. I attached some conductive tape to the top of my lip balm lid, and my hairclip conducts electricity. The last step of the routine is to gargle some salt water, as the water conducts electricity and completes the circuit.
I’ve been thinking about more types of liquids that can conduct electricity. I’m really interested in human-ness and girliness so maybe tears or make-up/beauty products. Last year for physical computing my switch turned on when you put lipstick on. If you guys have any feedback/ideas let me know!
Week 2: Project Planning
1. Ideation:

- Interest in using visual output to assess whether measurement is correct
- E.g. LED lights up when plant has enough water, light turns on if it’s raining
2. Final Idea:
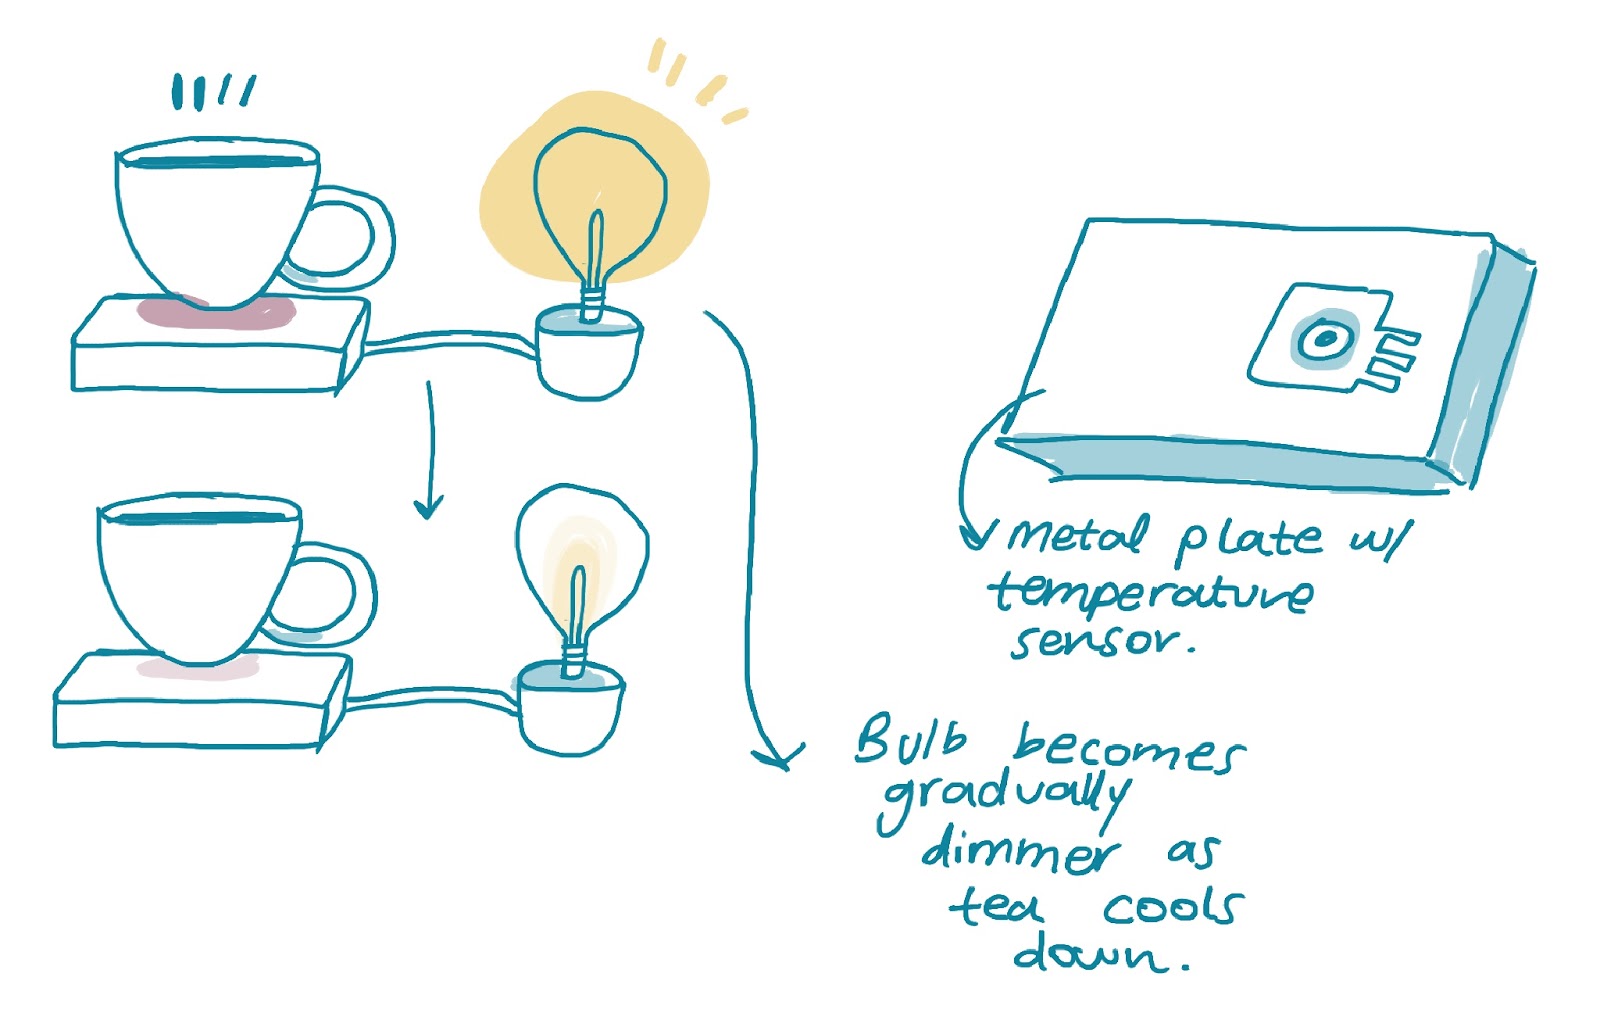
- Tea dimmer!
- How does it work?
- The arduino will control a temperature sensor which will control the dimmer on a light bulb. When the tea is hot, the light is bright and dims as the tea becomes cold. A temperature sensor is pointed at the tea, the arduino uses the input to determine power given to LED
3. Inspirations:
- Slow Dimming Study: Rice Dimmer - Yeseul Song
- What happens if lights were controlled by forces rather than humans? Wind and rain controlled lights
4. Bill of Materials:
| desc | qty | Part # | Seller | Price (each unit) |
| Non-Contact Infrared Temperature Sensor | 1 | GY-906 MLX90614 | EC Buying | 12.69 |
| Light bulb | 1 | Undecided | Undecided | |
| Relay | 1 | HiLetgo | 7.39 |
5. System Diagram:
- Info on Temperature Sensor (Here)
- Contains a thermometer chip
- Non-contact sensor
- The temperature measured by the sensor is the average temperature of all objects in the field of view
- A relay will be used to allow the arduino to control a lightbulb rather than an LED (this will make the project more useful (LEDS don’t really emit that much light)
- Because the temperature sensor is non-contact, the sensor will instead be pointed at the tea cup instead of sitting underneath it
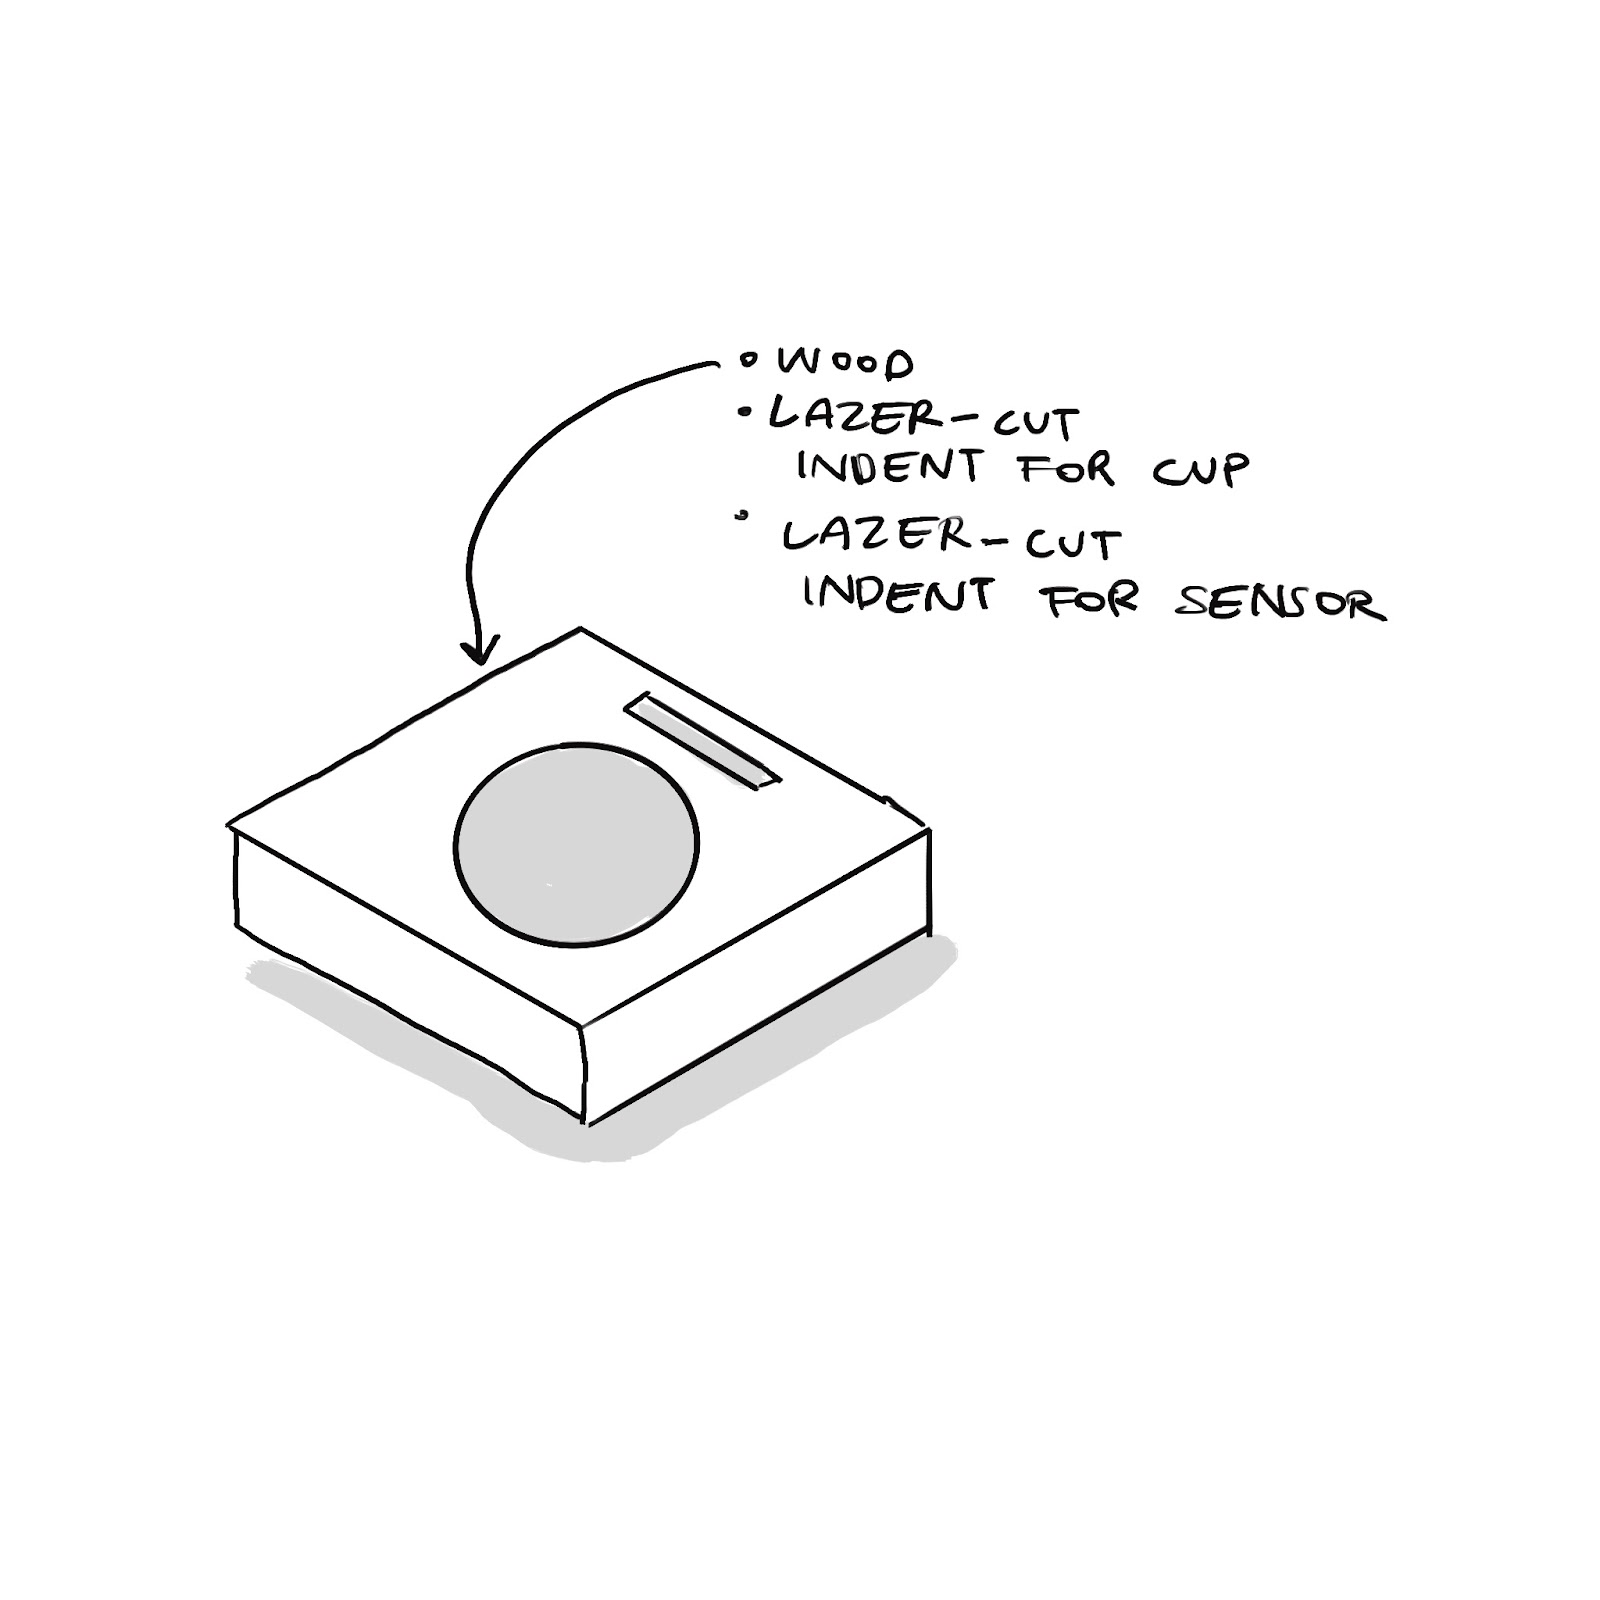
- Plan for plate that the cut rests on:
- Laser cut
| Installation Time |
- Boil tea
- Pour into tea cup
- Wait until cools down, light should dim
- Possible errors
- Hopefully the circuit doesn’t get damaged in transit
- The tea needs to be hot enough for our presentation
- The tea will probably take a while to cool down, hopefully the light dims by the time we’re done discussing the project
Week 3: Project Planning (pt. 2)
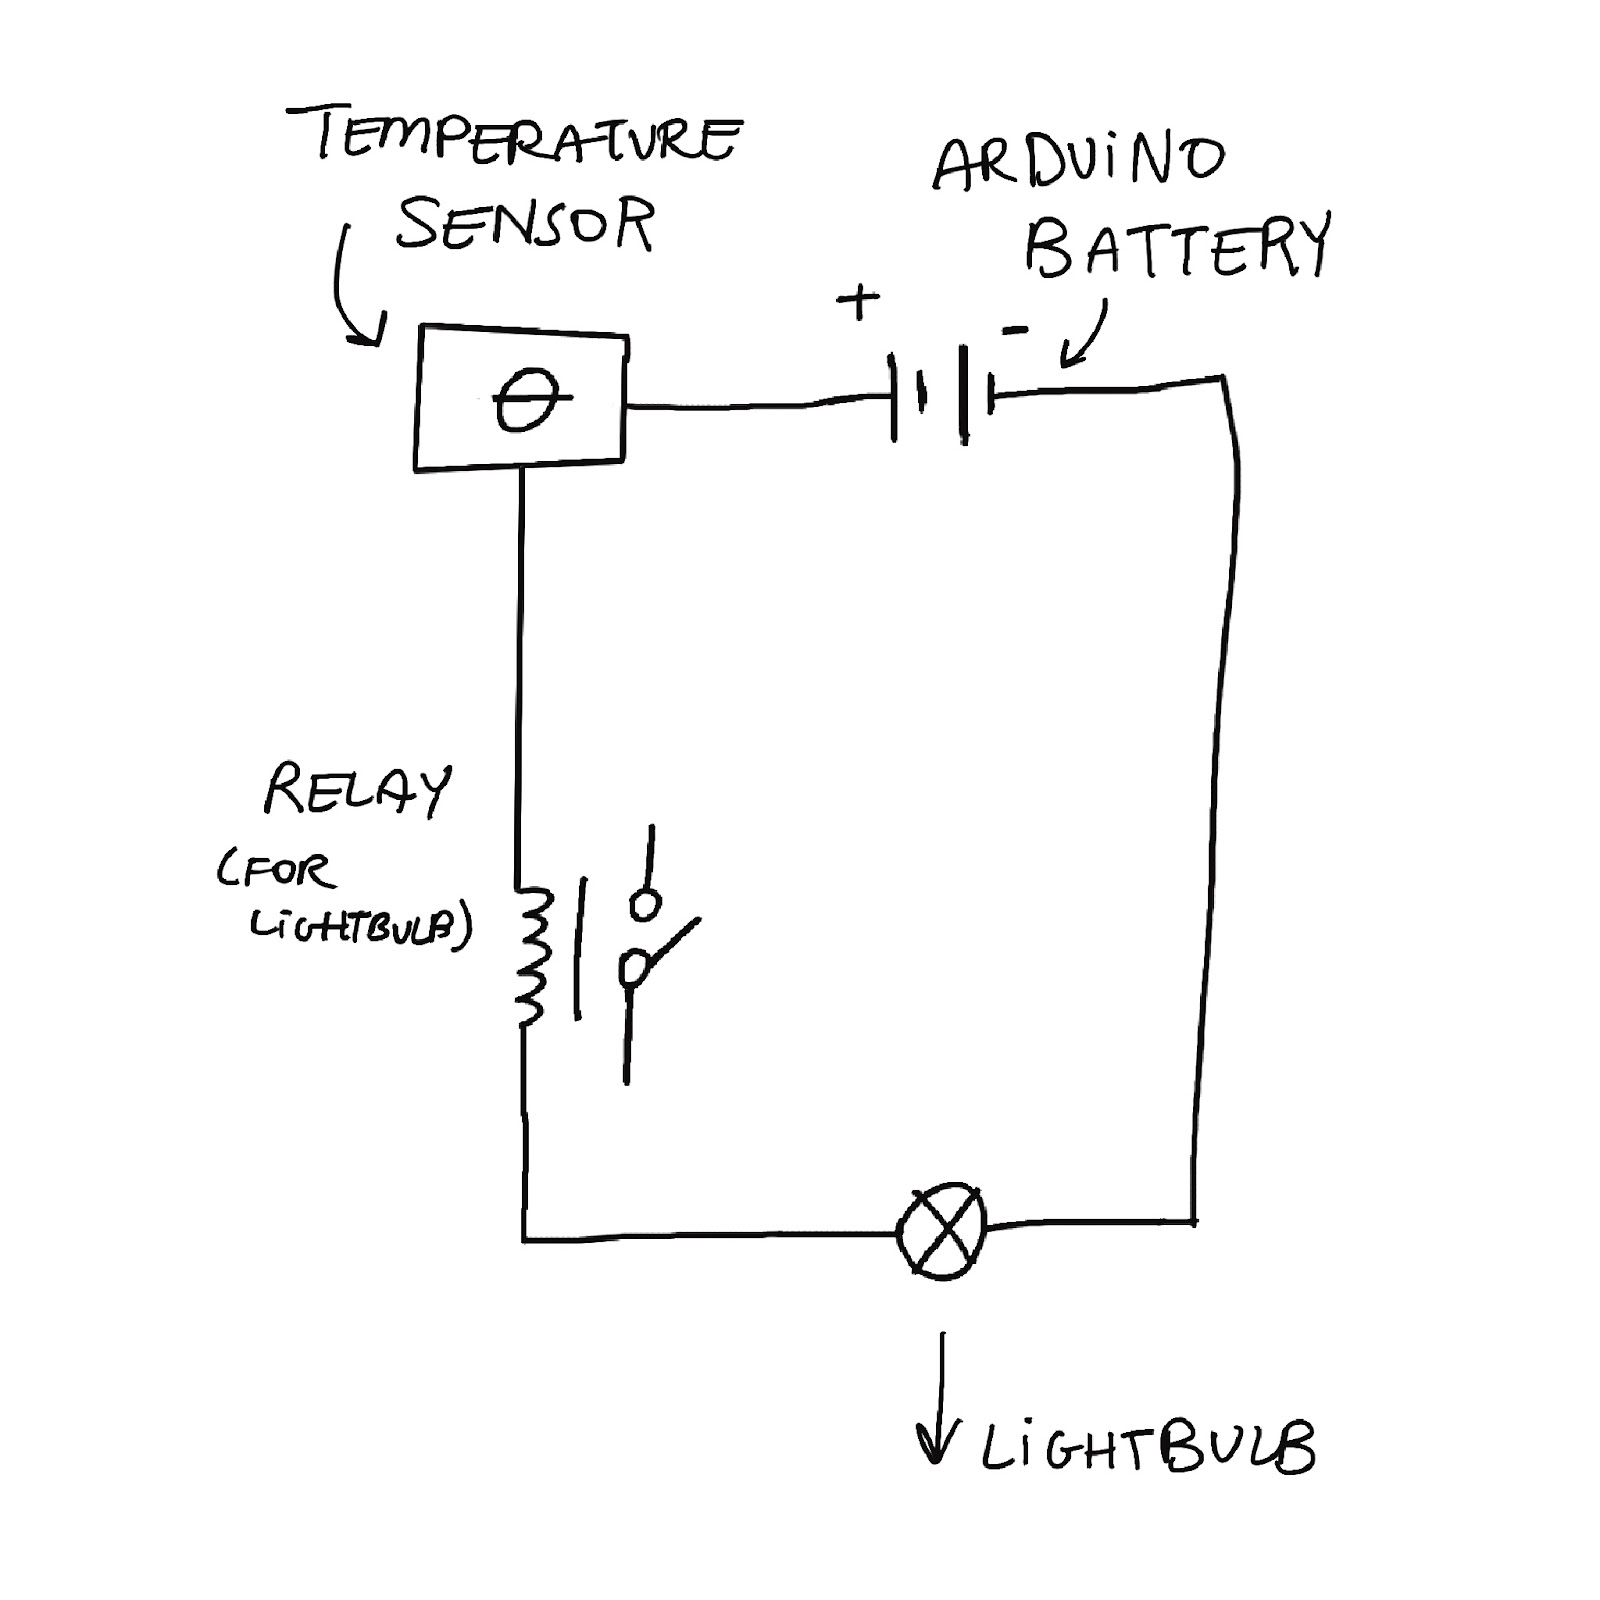
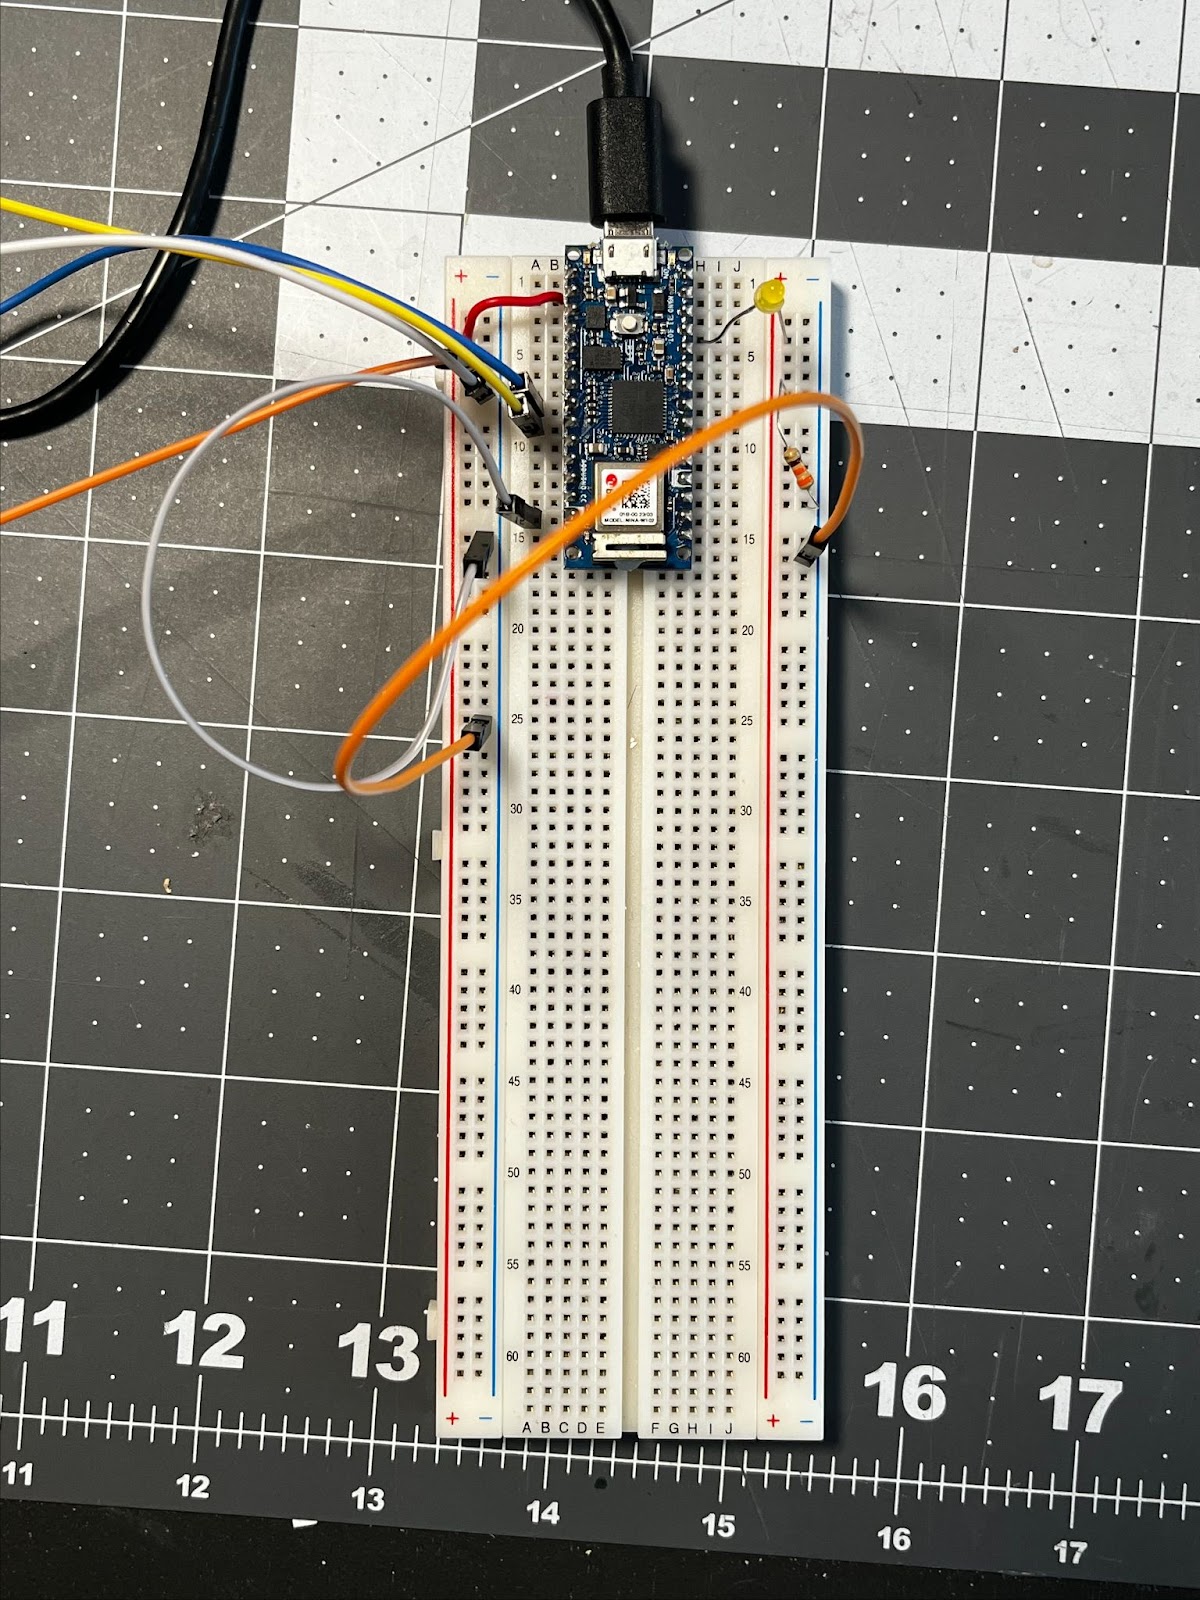
This week we worked on developing our project. We got the temperature sensor to work by soldering it to wires and attaching it to the LED. The wiring was quite simple–the power connected to the sensor, then the LED, then to ground with a resistor.
Circuit Diagram:
Video Documentation:
For the code, we mapped the temperature range to a LED brightness.
int brightness = map(constrain(objectTemp, 30, 85), 30, 85, 0, 255);
Hardware:
We worked on a design that would contain the LED and breadboard. It is made up of several different parts: a surface where the cup would be placed, a layer that functions as a light box, a base where the Arduino would be held, and something to hold the temperature sensor over the cup.
We decided that we would use LED strips, which was more powerful than the LEDs we were using and transparent acrylic sheets to make a light box, so that it would be obvious to the user when the lights dimmed/brightened.

Week 4: How to Turn on Lights: Documentation
Title: Tea-mometer
Description: This lightbox indicates when your tea is hot or cool. A temperature sensor sends input to LEDs which change color and play animations based on the temperature. When hot, red embers are displayed, and when cold, raindrops appear!
Circuit/Code Documentation:
Box documentation:
Process documentation:
- Getting the temperature sensor to work was pretty cool :)
Happy moments / Challenges
- Happy moments
- Getting to see the LED visual output–the color change is so satisfying!
- Putting the whole thing together and testing it for the first time :)
- Challenges
- Using warped wood made laser cutting really hard
- The heat of the cup warped the acrylic of the box into a concave shape
- Figuring out how to do animations – hot like flame embers, cold like raindrops
If you had more time on this project, what would you improve?
- We would want to make the sensor indicate when the ‘perfect temperature’ is either by flashing green or making a noise
- We would want to reinforce the box by adding additional laser cut supports
- The lights still indicate temperature even when mug is not there–maybe we could add a weight sensor so it knows when a object is placed on the lightbox
What would you do differently?
- We could make the overhanging arm part fit into the design more naturally? Maybe we could make the temperature sensor be a part of the light box e.g. by measuring the temperature from underneath
- We could have hidden the wiring even more
If you had a chance to do a user testing of the project, what did you learn from it?
- The temperature changes quite slowly (beecause tea cools down slowly) which makes the project feel very calm but it also prevents the user from having an immediate reaction
Credits
- Thanks for the shop for giving us wood
- I used ChatGPT to teach me how to code the animation aspect of the code--I’ve never done this before! I slightly altered the code to get my exact result (https://chatgpt.com/share/67bd1a59-aecc-800d-80f6-2a2e8ba3ec91)
Week 6: Object Interactive Planning
Idea 1: A way of creating ceramics using a servo motor instead of human hands :) Challenging the separation between human and machine, seeing if Arduino is capable of completing a human task.
System Diagram: I would connect an Arduino to two servo motors and a button. When the button is pressed the motors would ‘wedge’ the clay in two directions. The first servo motor would hit it sideways and the second would push it down. The servo motors will be mounted on wooden pikes so that they’re at the correct level.

Considerations: Will the servo motors be powerful enough to wedge the clay? How will the clay stay in the same position and not be pushed over by the motors?
Bill of Materials
| Item | Quantity | Seller | Price |
| Arduino | 1 | In the kit | Free |
| Breadboard | 1 | In the kit | Free |
| Servo motor | 2 | One in the kit, one I’ll get on amazon – Amazon.com: WWZMDiB SG90 Micro Servo Motor for Arduino Raspberry Pi DIY (3 Pcs) | 6.99 |
Idea 2: A way of painting ceramics? Attaching a motor so that the paintbrush has an up/down motion
System Diagram: Similar to the first idea, the Arduino will be connected to a servo motor and a button. When the button is pressed the motor would paint the clay with glaze :) Again, I would need to figure out a way to mount the servo so it’s at a good level/can paint vertically.

| Item | Quantity | Seller | Price |
| Arduino | 1 | In the kit | Free |
| Breadboard | 1 | In the kit | Free |
| Servo motor | 1 | One in the kit | Free |
Week 7: Object Interactive
Title: Clay Wedger
Description: Is a machine capable of wedging clay? How would the machine approach the task? I’ve been thinking a lot about job automation given rapid advancements in AI/tech. Are there some jobs that machines are simply bad at? Would a machine be able to automate the entire ceramic process? Will hand-made objects become increasingly valuable given the involvement of a human?
Circuit/Code Documentation:
Box documentation:
Process documentation:
- I drew and laser cut the hands on the floor and then attached them to two blocks of wood to keep the clay in place. You can see there’s a drill hole in one of the hands because I wanted to try attaching string to the motor and spinning it from the center but it didn‘t work so I had to cut into the wood and embed the motor
Happy moments / Challenges:
- Happy moment: Seeing the hands move for the first time!!
- Challenge: Trying to replicate the wedging motion without using my hands--it’s something that felt hard to convert to robotics because of how natural/intuitive it is
If you had more time on this project, what would you improve?
- I’m really interested in the idea of working more with these servo hands. I think automated hands could do a bunch of tasks (like painting, high-fiving, handshaking) and it would be cool to compare the robot process to a human completing the same task.
What would you do differently?
- I think right now the project feels more metaphorical than physical. There isn’t enough force to make the hands super capable of wedging clay but I think it would be to cool to make the clay actually do it. If I were to work on the project more I would find more powerful servos/position them more effectively.
Credits:
-I used the default code that comes when you install the Servo Motor Arduino Library as a starting point.
Week 8: Sensor Research
https://docs.google.com/presentation/d/1nV2r9Rwdj2QG-NWoCTlzQ2yt4sIu3735fexTTDb9VWE/edit?usp=sharing
Week 9: Physical-Virtual Project Research
https://docs.google.com/presentation/d/1-3CBa7kodnElMxCFygzGa2QlCB2YXrYIeT3j1z9buy8/edit?usp=sharing
Week 10: Sensor Lab & Final Draft
Lab: Sending one value from p5.js to Arduino using webserial
I initially struggled a lot with getting the board to connect to my computer. I kept getting the error message “No board found”. I spent some time troubleshooting and figured out it was because I had my serial monitor open (so annoying!).
I think this lab is really cool because it allows PCOMP to be controlled through the web. I think it opens a lot of doors for web communications. I’m thinking about virtual ceramics where a user can press a button on a website and a machine wedges/throws clay. It also reminds me of my communication presentation on Wafaa Bilal.
Final: Hidden dentist tools
Teeth have always been a scary thing for me. When I was seven I had to get a tooth removed for the first time. My mom brought me to the dentist and she prepared to rip it out of my mouth, with the promise of candy afterwards. As the tool got closer to my face, I just could not do it. I flipped over and screamed “YOU CAN’T MAKE ME!!!!!!!!”. She did make me (after an hour and a half of arguing). Following dentist and orthodontist appointments went similarly.
Around this same time, my older brother and I got two identical shark plushies. He named his Mr. Sharkie and I named mine Mrs. Sharkie. I immediately cut out Mrs. Sharkie’s front tooth with a pair of scissors. I’m not really sure why I did this. Maybe it was some primal urge to destroy. Last year, I made a ceramic series about her.

For some weird reason, my dad and I have a continuous and infinitely complex narrative involving every single stuffed animal I own. I’m almost 20 and this narrative is still ongoing. But as I got older the narratives somehow became darker and more adult. Mrs. Sharkie hasn’t accepted that Mr. Sharkie (who my brother got rid of) left her. Mrs. Sharkie is also unaware of why her tooth is missing. I can’t bring myself to admit it to her.
When I was 11, I went to the dentist for a regular cleaning. Everything went smoothly, until she told me she would need to inject anaesthetic for a “standard procedure”, and then I heard some noise. I didn’t really feel anything, I went home, and never thought about it again.
A few years later, my mom told me that was my first cavity removal. Her and the dentist corroborated to not tell me. For my final, I want to create hidden dentist tools.
I got really inspired by the DC motors lab and how fast it would spin. I want to recreate a dental drill but hide it inside another object (food, makeup, stationary). It would turn on when the user presses a hidden button. I’ll start by figuring out how to make a dental drill. I think the main issue will be the size of the drill and hiding it considering how big PCOMP parts can be. I’ll probably make the objects ceramics--this will give me the most control over customizing the PCOMP integration. Maybe the huge motor/PCOMP parts don’t have to be hidden--maybe that’s what makes it funny.
Concept Sketch:


Week 11: Project Planning
1) Installation Plan
- Mount Arduino board inside hotdog
- Connect battery pack to power motor and Arduino
- Attach servo motor inside hot dog
- Mount button inside hot dog casing
- Wire button
-
Place hot dog in visible position for interaction
2) System Diagram
Object Diagram:
Code Diagram:
3) BOM (Bill of Materials)
4) Project Timeline
- 04/22: Finish planning, order all materials
- 04/26: Prepare code so that I can make the object the next day
- 04/27: Full fabrication day! Get motor button working, attach arduino and all parts into hot dog ! Should be finished by then
Week 12: Project Progress
So... there were some changes to my project. The main thing that I was struggling with was the interaction. I couldn’t figure out a way to I went to office hours and David and I discussed some potential interaction ideas:
- Speaker attached to mouth that screams or says “PLEASE HELP ME” when touched, either detects touch using conductive paint, conductive gel, or wires?
- Instead of screaming, the Arduino beeps
- Mouth is attached to a platform, motors make the platform shake in fear when touched
- How should the hotdog interaction work? The user turns it on with a button?
- All the other dental stuff I bought--static objects to accompany the hotdog?
- Dental light?
It just felt like I had a lot of ideas happening at once. There was the hidden dental drill, there were the other non-functional dental items, there was the responsive mouth, there was the dental light. The project was starting to feel clunky.
I started by just experimenting. I tested that the motor (which will become the drill) conducts electricity so that the tooth can detect its presence. I also got it running with a 5V power supply and it goes super fast and makes a great noise.
Because there are a lot of limitations when it comes to Arduino and sound, I knew I wanted to use a Raspberry Pi connected to a bluetooth speaker. I had never used a Raspberry Pi before but it was surprisingly very easy. I connected the SD card to a monitor. My dad helped me write it.
Next, I drilled a hole into the mouth to make room for a wire. I decided that when the wire (hypothetical cavity) gets touched, the mouth will scream. I also recorded a clip of myself screaming :)
Here’s the project so far:
Week 12: Final Project
1) Project title and description
“Fill Me In” by Noelle Darts
Teeth have always been a scary thing for me. When I was seven I had to get a tooth removed for the first time. My mom brought me to the dentist and she prepared to rip it out of my mouth, with the promise of candy afterwards. As the tool got closer to my face, I just could not do it. I flipped over and screamed “YOU CAN’T MAKE ME!!!!!!!!”. She did make me (after an hour and a half of arguing). Following dentist and dentist appointments went similarly.
When I was 11, I went to the dentist for a regular cleaning. Everything went smoothly, until she told me she would need to inject anaesthetic for a “standard procedure”, and then I heard some noise. I didn’t really feel anything, I went home, and never thought about it again. A few years later, my mom told me that was my first cavity removal. Her and the dentist corroborated to not tell me.
In “Fill Me In” (a play on filling cavities and how I wasn’t filled in on the procedure), the user is prompted to fill five cavities using a motorized dental drill. Once the cavities are filled the user can close the mouth and play again. The mouth screams “AAAAH” “OW” “I HATE GOING TO THE DENTIST” when the cavities are touched.
2) Final video documentation
3) Circuit and Code documentation
I wanted to use a Rasperry Pi because my main output is audio and Arduino isn’t great for that. I had some experience with Rasperry Pi but not enough with coding in Python for PCOMP. I used ChatGPT to teach me how to write the code. Here is the original code:
These are the notes I took on the code to learn Raspberry Pi:
4) Process documentation
1. I started by 3D modelling and printing the handle for the dental drill. I imitated the motor cap that David gave me in Fusion 360 and then looked at reference images of drills to model. It was wasn’t too complex.
2. Then I wired the teeth. Last week I drilled a hole into one tooth so I drilled the rest. I attached five copper wires from the inside of the teeth to male-female wires and soldered and shrink-wrapped them together and connected them to the GPIO17, 23, 22, 23, and 24 pins of the Rasperry Pi.
3. I then worked on wiring the motor. I ran the wires to a battery pack through the hollow inside of the motor. Then I added a piece of copper that attached to another wire meeting the end of the drill bit (which I already tested for continuity), which sent input to the Raspberry Pi.
4. I tested how many batteries to put in the battery pack so I could adjust the speed of the motor. I ended up picking two batteries because three was too fast which damaged the teeth and one didn’t feel drill-like enough.
5) Happy moments / Challenges
- Happy: Getting to see user reactions when they touch the mouth/drill for the first time! Most of my friends/family laughed when they saw it for the first time.
- Happy: Seeing my project come to life from idea to end
- Challenges: Using a Raspberry Pi for almost the first time and figuring out how to code/debug
- Challenges: things randomly breaking
- Challenges:
6) If you had more time on this project, what would you improve? What would you do differently? If you had a chance to do a user testing of the project, what did you learn from it?
- Improve: I would make it more gamified, I would add more dental instruments, make the interaction more complex--maybe there could be a different goal, or the project could have more to do with how I was gaslit into going to the dentist as a kid.
- User Testing: I learned how important instructions are. Without them, people didn’t know what to do. That’s why I added the intro and closing audio.
7) Credits:
I credited ChatGPT earlier in the post for help with coding.
Thank you to Proud and David for helping me ideate during office hours!